Combat Robot Programming Manual

Introduction to Robotic Fighting:
Getting Started:
Using Combat Robots in an Offical Arena
Entering your Combat Robot
Watching a match
Controlling the Cameras
Robot #1 & Robot #2 Cameras
Robot #1 & Robot #2 Follow Cameras
Arena Cameras
Free Camera
Zooming
Sub-views
"Knowing the Score"
Domain Zones (new! 102802)
Programming your robot (by example)
User Comments
Initilizing your robot
Robot AI function
Appendix A: AI Commands and Variables
Robot Commands
Robot Control Variables
Environment Variables
Constant Values
Appendix B: Robot Chassis
Appendix C: Weapon Systems
Appendix D: Robot Physics
Welcome to the galaxy-wide family of Ctec Combat Robot owners. We trust that your Ctec Combat Robot will bring you many hours of safe and fun robot combat. Ctec robots are designed to be easy to use while maintaining the reliability, survivability, and damage potential you expect from a Combat Robot.
To ensure your satisfaction with this robot, we encourage you to familiarize yourself with the equipment descriptions, operating instructions, and programming guides in this manual. We also urge you to observe all safety protocols while programming, running, or recovering your Combat Robot. PLEASE DO NOT OPERATE A COMBAT ROBOT WHILE UNDER THE INFLUNENCE OF ALCOHOL, MEDICATION, OR ANY OTHER IMPAIRMENT.
Do not operate your Combat Robot on other worlds before investigating that world’s applicable robot and weapons regulations. In some cases it may be difficult or impossible to comply with these regulations. The GT&W strictly prohibit bringing a combat robot to any class 1, 2, or 3 world!
Introduction to Robotic Fighting:
In the past (barbaric times) it was common for disagreements between individuals, nations, and worlds to be solved by having the life forms on both sides kill each other. These brutal conflicts resulted in countless lives being lost and billions of credits worth of resources being wasted. An untold number of species have been removed from the galaxy due to this type of behavior.
If one of these hostile species had a high enough technology they often created robots that could be used to fight in their place. This saved lives on the side that owned robots but increased the loss of life for those who did not. If both planets were advanced enough they would both use robots to fight each other. This greatly reduced the loss of life on both sides but the damage to the surrounding environment and economy was just as great.
This went on for many cycles until eventually the Galactic Trade & Warfare Organization, which at that time was known only as the Galactic Trade Organization, decided that the loss of resources in these conflicts was adversely effecting the galactic economy. They imposed strict rules and guidelines on how conflict could be handled. Under the new rules both side would enter into an agreement in which each side would create one robot that would compete against a single robot created by the other side. The fight would take place in a specially sanctioned arena on a neutral world. The winner of the fight would win whatever was agreed on and the loser was allowed a temporary immunity to any conflict.
This solution became extremely popular among the ‘civilized’ planets (planets refusing to solve their conflicts in this manner are considered ‘dangerous’ and are quarantined from the rest of the galaxy). Once the Galactic Net (GNet) was instituted, live feeds from robot matches quickly became the second most viewed material on it (right after "mating rituals"). With on-site betting, tourism, and ticket sales, hosting a match on your planet was a great source of income. The matches became so popular that many planets would ‘make up’ disagreements with each other just to create a match to broadcast. To reduce the number of made up conflicts, the Galactic Trade & Warfare Organization started a special ‘training branch’ of robot conflict, thus the Robotic Combat League was created and Robot Combat became an official sporting event.
Getting Started:
Your Ctec combat robot comes complete with all the weapons, sensors, and power sources necessary to compete in competitions. The only thing missing is the set of instructions (called a script) used to pilot the robot in combat. When competing in a "fixed chassis" type competition each robot must conform to one of a few select body types. This means that the scripting in each robot, not the hardware, determines the winners from the losers.
To get you started we have included a couple of basic prewritten scripts for your robot to run. You can start experiencing robot combat immediately by loading a couple of these scripts into your robots and starting a match (see "Entering your Combat Robot" below). You can also use these scripts to form the basis of your own combat robot (see "Programming Your Robot" below).
Using Combat Robots in an Offical Arena
Due to the banning of physical conflict throughout most of the civilized galaxy, most Combat Robots are used only in arena sporting event. Robot Combat Arenas (RCAs) allow for maximum enjoyment of Combat Robots with minimal adverse effects on the surrounding world environment.
Entering your Combat Robot
To enter your robots into an arena match simply launch the "GArena Launcher" (GAL) and select the two robot AIs from the pre-built AI folder (or a folder of your choice). Once the AIs are selected, press "Launch Game" and the program takes care of the rest.
Watching a match
Due to the popularity of Arena Robot Combat, the distance of the arena from your home world, and the possible incompatibilities of the atmosphere, the best way to watch your robot fight is by viewing the live GNet camera feed of the match in the comfort of your own habitat. The GArena Launcher will automatically switch you to the GNet camera feed when you send your robots to the RCA.
When a match begins you will be given the default view for that arena (normally an arena camera view) and maybe one or more "sub-windows" that can be receive feed from other views.
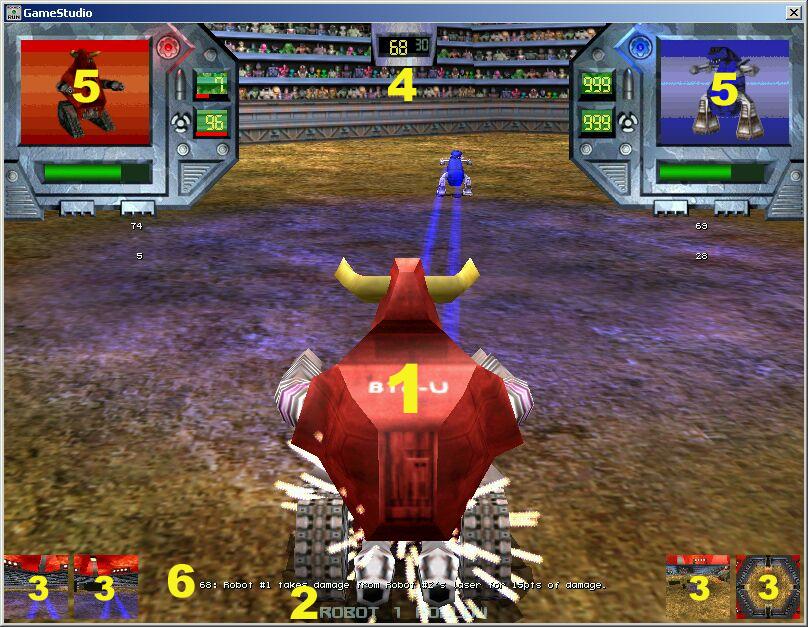
1) Main View: this is the window under your control
(see "Controlling the Cameras" below).
2) Current View Name: this is the name of the current main view camera.
3) Sub-views: you can have 0 to 4 sub-view (see "Sub-Views" below).
4) Clock: amount of time (in seconds) remaining in this match
5) Robot Status: display of the current robot status (see "Knowing the Score" below).
6) Message Line: displays the last significant event to happen.
Controlling the Cameras
You can change the main camera view to one of six cameras.
Robot #1 & Robot #2 Cameras
By pressing the ‘1’ or ‘2’ keys you will receive the "in robot" view for robot #1 or #2. This is normally one of the more exciting views in the game (depending if the robot is on the giving or receiving end of most of the damage) but it is often hard to get the "big picture" of the match from this view.
Robot #1 & Robot #2 Follow Cameras
By pressing the ‘3’ or ‘4’ keys you will receive the "follow robot" view for robot #1 (3) or #2 (4). These views places you in a camera pod that is programmed to float behind the robot. It combines the excitement of the "in robot" view while allowing you a better sense of what is going on around the robot.
Arena Cameras
The ‘5’ key switches to one of the many Arena Cameras located in fixed positions around the arena. These cameras are programmed to follow both robot competitors during the match. If both robots do not fit into view, the camera will pick the closest robot to focus on.
The Arena Camera is unique in that it is actually more than one camera. All the cameras are stored in a list, with the last camera in the list pointing to the first camera. If you are already using the Arena Camera view, pressing the ‘5’ key again will switch you to the next camera in the list. Continue pressing this key until you find the view you like.
Free Camera
The Free Camera is very different from the other camera in that you control the view. By pressing the ‘TAB’ key you will create a new camera at the current camera location. You can move this camera with the mouse. The left button moves the camera forward, the right mouse button moves backwards, and moving the mouse itself controls the pan and tilt of the camera.
Zooming
You can zoom the camera in and out by pressing the ‘Z’ (zoom in) and ‘X’ (zoom out) keys. Each press of the key doubles or halves the zoom factor of the main camera.
Sub-views
You can display 0-4 "sub-view" windows at the bottom of the main view window. Sub-views allow you to monitor multiple views at once, and switch freely between these views. Note: you can only change the camera type of the main view window, to change a sub-view camera you need to swap it with the main view.
To activate a sub-view, press one of the keys corresponding to that sub-view’s window. The keys ‘Q’,’W’,’E’, and ‘R’ active corresponding sub-views. If the sub-view is already active, pressing its corresponding key will swap that view with the main view. For example, if I press ‘Q’ when the far left’s sub-view is visible than that sub-view’s view becomes the main view’s view (and the main view’s view becomes the sub-view’s view).
To deactivate a sub-view, press and hold the "Ctrl" key and tap the corresponding sub-view’s key.
"Knowing the Score"
During the match you can track each of the robots’ vital statistics by reading their "Robot Status" information on the main view screen. The display on the left side of the screen is for robot #1; the right side display is for robot#2. The following information will be present:

1) Robot portrait: picture of your robot (before it gets damaged).
2) Current health: When this bar is empty, you robot is destroyed.
3) Ammo1: Number of rounds (rockets, bullets, shells, etc.) in the primary weapon.
4) Ammo2: Number of rounds (rockets, bullets, shells, etc.) in the secondary weapon.
The red bar beneath both the ammo counters shows graphically how much time is left until the weapon is reloaded
(black > 10 seconds, full red = reloaded).

At the bottom center of the screen, above the current camera view label, you
will find the message line. This will tell you the last significant event to
happen in the match. Don’t worry if you miss an event because the next event
happed right afterwards, a log of all events is saved to your computer
("gamelog.txt") so you can view them at your leisure. The event message includes
a "time stamp" showing the second that an action happened.
Domain Zones
Domain Zones
There are three 'domain zones' in the Arena. One zone is located at the center of the map; the other two are located at the robot's starting positions. Zones can be owned by either robot or be neutral. The zone will glow in the color of its owner (red for the red robot, blue for the blue robot, or green if currently neutral).
Claiming a Zone
When the center of a robot enters a 'domain zone' that it does not currently own, the ownership of that zone is passed to it (noted by a change to that robot's color). The zone will remain under control of that robot until the end of the match or until another robot touches it.
Note: If two robots are touching the same domain zone, the one closest to the center gains/retains ownership of that zone. In other words, you can maintain absolute ownership of a game zone by parking your robot dead center in a zone (but this will leave the other two zones open).
Why Claim Zones?
So why are zones important? In some contests, ownership of the zones will help decide which robot wins a match. Destruction is normally still the number one goal but zone ownership is often used as a tiebreaker if both robots finish the match. See the contest rules for more details.
But, perhaps even more important, is that zone ownership is used to calculate the damage multiplier.
Domain Zones Damage Multiplier:
A robot's weapons damage output is modified by the number of zones that robot currently owns. This is know as a "Damage Multiplier" and is calculated as follows:
0 zones: 0.5 * damage
1 zone: 1.0 * damage
2 zones: 2.5 * damage
3 zones: 5.0 * damage!!!
Using this information, you can see why owning zones can make a big difference in winning or losing a match!
Code to Help You Find a Claim Zones:
To help your robot find and claim zones, the following variables have been added:
qZone_own[3]; // 1 if you own it, 0 if not owned, -1 is opponent owns it
zone_dist[3]; // distance (in quants) from you to a zone
zone_angle[3]; // angle to face this zone.
Note: each zone related variable is a vector with 3 elements (0,1, & 2). Element 1 & 2 relate to the zones located at the starting points of robot #1 and #2. Element 0 is the zone in the center of the arena.
You can use this information in your code to find out which zones you do not own, and then move to claim them.
Example:
// if we don't own the center zone...
if(qZone_own[0] <= 0)
{
// move to the center zone
value7 = ang(zone_angle[0] - my_rot_vec.pan);
FUNC_ONE();
}
Programming your robot (by example)
Since robots come pre-built, with all the weapons and armor included, the only thing that distinguishes one robot from another is its programming. The winners are separated from the losers by the skill of the robot’s programming alone. Luckily for you we made programming your Ctec robot as easy as possible.
We will look at one of the simple prebuilt AI scripts example.gs. You can find this script in your "rscript" folder and open it with any text editor (i.e. Notepad). Open up this script now and follow along as we go through the steps of programming your robot. If you find a variable or command you want to know more about a complete list can be found in Appendix A: AI Commands and Variables.
User Comments
The first thing you will encounter when you view the robot script is a ‘user comment’:
// Example Robot Number 1
You will see comment blocks throughout the script. They are used by the scriptwriter to add comments to lines of code; they do not effect the robot in any way (they are simply ignored by the robot when running).
User comments come in two different types: single line and multi-line. Single line comments, denoted with a ‘//’ will make every character that appears after it into a comment. For example:
do_something(); // this is a comment
The "do_something();" is read by the robot but the "this is a comment" part is ignored.
A multi-line comment begins with a ‘/*’ and ends with a ‘*/’. The robot will ignore anything that appears between those two symbols. For example:
/* start the comment
comment continues
comment ends here. */
The robot will ignore all three lines.
Initializing your robot
After several lines of comments you will come to the first section of robot code:
function LOAD_ROBOT()
{
robot_type = 1; // use robot #1
}
This is the load robot function. It is executed once before the match begins and is normally used only to select the robot type to load (in this case robot #1).
robot_type = 1; // use robot #1
This line sets the robot type. The robot_type variable is a special robot variable that can only be set in the robot_load function. This tells the arena which robot chassis you plan on using (1,2,3, or 4).
You can set other starting values here as well. But any value set in this function will only be set once (when the robot is loaded).
Robot AI function
Once the match is started, the robot AI function is called once each turn. This is where you give your robot instructions on what to do based on the input it has gathered from its sensors and data stored in previous instancing of this function.
function AI_ROBOT()
{
// turn towards target
if(angle_to_target > 5)
{
// turn left
force_left = -5;
force_right = 100;
}
else
{
if(angle_to_target < -5)
{
// turn right
force_left = 100;
force_right = -5;
}
else
{
// move forward, full speed
force_left = 100;
force_right = 100;
// Weapons control
// fire only when target angle is > 5 and < -5
// and the robot is in range of weapon.
if(distance_to_target < 2000)
{
gun2_fire = 1; // fire secondary
}
if(distance_to_target > 50)
{
gun1_fire = 1; // fire primary
}
}
}
}
This is the second function in our script and, like LOAD_ROBOT, it must be named exactly like shown.
function AI_ROBOT()
{
The first thing we encounter inside the body of the function is an ‘if else’ statement:
// turn towards target
if(angle_to_target > 5)
{
// turn left
force_left = -5;
force_right = 100;
}
else
{
This statement checks the environmental variable angle_to_target, which gives the relative angle of the target to the current facing of your robot. If this value you is greater than 5 ("if(angle_to_target > 5)") then the target is more than 5 degrees to the left of your robot. In this case we want to turn counter-clockwise so we can face our target, we do this by moving the left wheel slower than the right one (see Appendix D: Robot Physics below if you don’t understand why).
If the target is not more than 5 degrees to the left we will execute the code in the else part of the statement:
if(angle_to_target < -5)
{
// turn left
force_left = -5;
force_right = 100;
}
else
Inside the else statement is another nested ‘if else’ statement. This one is almost identical to the first except it checks to see if the target is less than –5 degrees placing it to the right of the robot. If this statement is true, we turn the robot clockwise.
The next section of code is nested inside two if statements so it is only executed if both if statements are false. Therefore the following code is only executed if angle_to_target <= 5 and angle_to_target >= -5. In other words, if angle_to_target falls inside the range of –5 to +5.
The first block of code should be easy to read:
// move forward, full speed
force_right = 100;
force_left = 100;
Since we are facing the target we will move towards it at full speed.
The next block of code handles weapon fire. It uses two non-nested if statements:
if(distance_to_target < 2000)
{
gun2_fire = 1; // fire secondary
}
if(distance_to_target > 50)
{
gun1_fire = 1; // fire primary
}
Since this code is already in a block that is only executed when the robot is facing the target all we have to do is check the range to see if we want to fire either gun. Since the type #1 robot has a cannon and a machine gun as its primary and secondary weapons we will design the code to fire when the range for those two weapons is met.
The first if statement checks to see if the target is within the range of the machine gun (2000 quants). If so, we will set the gun2_fire skill to 1. Doing this will tell the gun to fire one round as soon as it can. If the gun is loaded it will fire this round at the end of the cycle.
The second if statement does the opposite. Since the cannon has a long range it is not necessary to check to see if it will reach its target, but it is necessary to make sure that the target is far enough away that the robot will not take blast damage from its own weapon. Therefor we check to see the target is greater than 50 quants away before firing.
Robot Local functions
So now you have a fully functional robot but it’s not the smartest robot in the galaxy. Eventually you are going to want to improve it by adding more code. This is relatively easy to do, just type more lines into the "AI_ROBOT" function, test your robot, add more lines, and repeat as needed. The downside to this method is, after you add several lines of code to your function, it will start to become extremely hard to read and debug.
To help split your code into more manageable sections we have provided you with eight ‘local’ functions called: FUNC_ONE, FUNC_TWO and so on up to FUNC_EIGHT. These functions are used in much the same way as the LOAD_ROBOT and AI_ROBOT functions except you can call them yourself. For example, our previous AI can now be written as follows:
function LOAD_ROBOT()
{
robot_type = 1; // use robot #1
}
// Desc: handle movement
function FUNC_ONE()
{
// turn towards target
if(angle_to_target > 5)
{
// turn left
force_left = -5;
force_right = 100;
}
else
{
if(angle_to_target < -5)
{
// turn right
force_left = 100;
force_right = -5;
}
else
{
// move forward, full speed
force_left = 100;
force_right = 100;
}
}
}
// Desc: fire control
function FUNC_TWO()
{
// Weapons control
// fire only when target angle is > 5 and < -5
if((angle_to_target < 5) && (angle_to_target > -5))
{
// and the robot is in range of weapon.
if(distance_to_target < 2000)
{
gun2_fire = 1; // fire secondary
}
if(distance_to_target > 50)
{
gun1_fire = 1; // fire primary
}
}
}
function AI_ROBOT()
{
FUNC_ONE(); // handle movement
FUNC_TWO(); // fire control
}
This makes function "AI_ROBOT" is much easier to read. It also ‘compartmentalizes’ your code, allowing you to more easily replace a function or copy that same function to other robot scripts.
Local functions are a powerful tool but there is one thing you need to look out for, endless function loops. This can happen if one of your functions calls AI_ROBOT() or if a function calls another function which calls that function.
For example:
function FUNC_ONE()
{
FUNC_TWO(); // call function two
}
function FUNC_TWO()
{
FUNC_ONE(); // call function one
}
function AI_ROBOT()
{
FUNC_ONE(); // call function one
}
If you make a mistake like this your robot will cause a "fatal engine error" and your robot will be disqualified.
Congratulations!
That’s it, you have completed your first combat robot. This design is extremely simple but efficient. It makes a good basis for your future robot designs.
To design a better robot, take a look at the other designs in the robot AI folder and look over the Appendices in this manual to find out what your robot can do and how to communicate with it. With a little effort and lots of practice your Ctec combat robot can give you years of enjoyment.
Appendix A: AI Commands and Variables
Robot Commands
The following commands are avaliable for use in your robot script:
= (the assignment operator)
You can use ‘=’ to assign a value or the result of a function or arithmetic expression to varable.
Example 1: value1 = -5; // assign -5 to value1
Example 2: value1 = abs(-5); // assign result of "abs(-5)" (+5) to value1
Example 3: value1 = 3+2; // assign result of "3 + 2" to value1
+,-,*,/,(,)
You can use these mathmatical operators to create arithmetic expressions.
Example: value1 = (3+2)*4; // assign result of "(3 + 2)*4" to value1
+=,-=,*=,/=
"var += expression" is shorthand for "var = var + expression".
Example: value1 += 5; // value1 = value1 + 5
abs(x)
Returns the absolute value of x.
Example: value1 = abs(-55); // value1 = 55;
asin(x), acos(x), atan(x)
sin(x), cos(x), tan(x)
Return the trigonometric values where x is the angle in degrees.
Example: value1 = sin(90); // value1 = 1;
ang(x)
Returns the value x ‘shifted’ by a multiple of 360 to a value between –180 and +180.
Example: value1 = ang(270); // value1 = -90
fsin(x,f), fcos(x,f), ftan(x,f)
fasin(x,f), facos(x,f), fatan(x,f)
Return the trigonometric values like their non-‘f’ functions (listed above) scaled by the value f.
Example: value1 = fsin(90,7); // value1 = 1 * 7 = 7
frc(x)
Return the fractional part of x.
Example: value1 = frc(543.29); // value1 = 0.29
if( expression ) {instruction block 1 }
if( expression ) { instruction block 1 } else { instruction block 2 }
The code in the instruction block 1 is executed if the expression evaluates to ‘true’ otherwise the optional instruction block 2 is executed. The ‘else’ and second instruction block can be ommited.
Example #1:
// turn towards target
if(angle_to_target < 0) // target to left
{
// turn left
force_right = 100;
force_left = -5;
}
else
{
// turn right
force_right = -5;
force_left = 100;
}
An expression is created by comparing 2 values using on of the following operators:
|| true if either is true ("or"). Ex. if( value1 || value2 )
&& true if both are true ("and"). Ex. if(value1 && value2)
!= true if both are not equal. Ex. if(value1 != value2)
== true if both are equal. Ex. if(value1 == value2)
<= true if the first is less than or equal to the second. Ex. if(value1 <= value2)
>= true if the first is greater than or equal to the second. Ex. if(value1 >= value2)
< true if the first is less than the second. Ex. if(value1 < value2)
> true if the first is greater than the second. Ex. if(value1 > value2)
Please note that the "equals" comparison is done with "==", to differentiate it from the assignment instruction with "=".
Comparisons can be combined using brackets. Always use round brackets to determine the order of evaluation within the expression.
Example #2:
// Fire at target
if((angle_to_target < 5) && (angle_to_target > -5))
{
// target within 10 degrees
gun1_fire = 1; // fire primary
gun2_fire = 1; // fire secondary
}
An if instruction may appear within the winged brackets of another if instruction; this way you can 'nest' several if instructions.
Example #3:
// weapon control
if((angle_to_target < 5) && (angle_to_target > -5))
{
// fire only when target angle is > 5 and < -5
// and the robot is in range of weapon.
if(distance_to_target < 2000)
{
gun2_fire = 1; // fire secondary
}
if(distance_to_target < 500)
{
gun1_fire = 1; // fire primary
}
}
int(x)
Return the integer part of x.
Example: value1 = frc(543.29); // value1 = 543
max(x,y)
min(x,y)
Return the maximum (max) or minimum (min) of the two numbers.
Example: value1 = max(5,-8); // value1 = 5
value1 = min(5,-8); // value1 = -8
pow(x, y)
Returns the value of x raised to the power of y. Note: if x is 0 then y must be greater than 0 and if x is negative then y can not have a fractional part.
Example: value1 = pow(2,3); // value1 = 8
rb_random(x)
Returns a random fractional number between 0 and x.
Example: value1 = rb_random(6) – 3; // value1 = a number between –3 and
+3
Note: "rb_random(x)" replaces the 3DGameStudio command "random(x)". You can no longer use random(x) in your
robots.
return
Exits from the AI function.
Example:
// if value1 is greater than 50
// function will return before incrementing the value1 by 1.
// (value1 is unchanged if it is greater than 50)
if(value1 > 50) { return; } value1 += 1;
sign(x)
Returns –1 if x is less than 0, 0 if x is 0, and +1 if x is greater than 0.
Example: value1 = sign(-432.32); // value1 = -1
sqrt(x)
Returns the sqaure root of x. Note: x must be greater than or equal to 0.
Example: value1 = sqrt(4); // value1 = 2
vec commands
Vector commands (those commands starting with "vec_") are handled a little differently then the normal commands in that each vector argument (denoted by u, v, or w) is actually 3 values. For example, the command "vec_add(value1,value4)" results in the following:
value1 = value1 + value4;
value2 = value2 + value5;
value3 = value3 + value6;
Note: values should not ‘overlap’. For example
"vec_add(value1,value2)" will result in an ‘undefined’ result since value1 = value1 + value2 and value2 = value2 + value3.
vec_add(v,w)
Adds the vector w to v. The result is stored in vector v.
Example:
// value1 += value4; value2 += value5; value3 += value6
vec_add(value1,value4);
vec_diff(u,v,w)
Vector u is equal to v –w. If w and v are positions (x,y,z) then u is a vector pointing from w to v.
Example:
// value1,2,3 is a vector pointing from robot to target
vec_diff(value1, target_pos_vec, my_pos_vec);
vec_dist(v,w)
Return the distance (scaler value) between the two vectors.
Example:
// value1 = distance_to_target
value1 = vec_dist(target_pos_vec,my_pos_vec);
vec_dot(v,w)
Returns the dot product of the two vectors.
Example:
// value1 = (value4,5,6) dot (value7,8,9)
value1 = vec_dot(value4,value7);
vec_inverse(v)
Multiples all the values in vector v by –1.
Example:
// value1 = -value1; value2 = -value2; value3 = -value3;
vec_inverse(value1);
vec_length(v)
Returns the length of a v.
Example:
// value1 = distance I am from the origin
value1 = vec_length(my_pos_vec);
vec_normalize(v, x);
Converts the vector v to a vector of length x. The vector still faces the same direction.
Example:
// value1,2,3 is now a vector of length 4
vec_normalize(value1,4);
vec_rotate(v,w)
Rotates v by w.
Example:
// rotate value1,2,3 by value4,5,6
vec_roate(value1,value4);
vec_scale(v,x)
Scales the vector v by the value x.
Example:
// value1 *= 5; value2 *= 5; value3 *= 5;
vec_scale(value1,5);
vec_set(v,w)
Copies the values from w into v.
Example:
// value1 = value4; value2 = value5; value3 = value6;
vec_set(value1,value4);
vec_sub(v,w)
Subtracts w from v.
Example:
// value1 -= value4; value2 -= value5; value3 -= value6
vec_sub(value1,value4);
vec_to_angle(v,w)
Computes the pan and tilt angles from the second vector, and places
them into the pan and tilt parameters of the first vector. It also returns the length of the direction
vector. Very useful for trading an angle for a direction, thus computing the angles to a target.
Example:
vec_sub(value17,my_pos_vec); // vec < 17,18,19 > = vector pointing from my_pos_vec to vec < 17,18,19 >
vec_to_angle(value10,value17); // value10 = heading to vec < 17,18,19 >
Robot Control Variables
These are the values that can be used to control different systems (weapons, wheels, and scanners) in the robot or just used to store values. You can assign values using any arithmetic operator or function (listed above).
robot_type
The robot_type variable is special since it can only be set once in the robot_load function. This variable selects the robot chassis type to be used (1,2,3, or 4). If no type is selected, or the selection falls outside the range, the robot chassis will default to 1.
str_bot_name
str_user_name
These two string values can be used to display the robot's name along with your own name during the
game.
Example: Add the following lines to you LOAD_ROBOT function:
function LOAD_ROBOT()
{
str_cpy(STR_BOT_NAME,"My Robot");
str_cpy(STR_USER_NAME,"My Name");
robot_type = 1;
}
value1 to value20
These are 20 user defined values (variables, registers, etc) in your robot that you can use to store and retreive data from.
Example:
// This fires the primary weapon every 50 frames.
value5 += 1; // increament value5
if(value5 > 50) { gun1_fire = 1; value5 = 0; }
force_left (range: -100 to +100)
force_right (range: -100 to +100)
This is the percentage of force each wheel (or tread) receives. By adjusting the amount of power to each wheel separately you can effect the direction, and speed, that the robot travels.
Example:
// move forward, full speed
force_left = 100;
force_right = 100;
// turn right (clockwise) quickly in place
force_left = 100;
force_right = -100;
// turn left (counter-clockwise) while moving forward
force_left = -25;
force_right = 100;
apply_brake (ON or OFF)
This flag allows you to stop quickly. When the brake is set (apply_brake = ON;) then the robot will slow down to a stop. Different robots slow down at different rates (the hover robot has very poor brakes). Make sure to turn off your brakes (apply_brake = OFF) before you start to move again.
Example:
if(distance_to_target < 500)
{
apply_brake = ON;
}
else
{
apply_brake = OFF;
}
gun1_fire
gun2_fire
These two values let you fire the robot’s primary (gun1_fire) and secondary (gun2_fire) weapons. When this value is greater than 0, the robot will try to fire its weapon that turn. If the weapon has ammo and is reloaded (see the ammo and status in Environment Variables below) then the weapon will fire and the value stored in gun#_file will be reduced by one.
Example:
// fire at target when close
if(distance_to_target < 2000)
{
gun1_fire = 1; // fire primary
gun2_fire = 1; // fire secondary
}
FUNC_ONE
FUNC_TWO
FUNC_THREE
FUNC_FOUR
FUNC_FIVE
FUNC_SIX
FUNC_SEVEN
FUNC_EIGHT
These are ‘local’ functions that you can use to write you own sub-routines that can be called from your main robot script.
Example:
// Desc: fire at target when close
function FUNC_ONE()
{
if(distance_to_target < 2000)
{
gun1_fire = 1; // fire primary
gun2_fire = 1; // fire secondary
}
}
function AI_ROBOT()
{
FUNC_ONE(); // fire at target when close
}
Environment Variables
Environment variables are ‘read only’ values that you can use to find information about certain ‘environmental’ factors like time remaining, your target’s position, etc.
angle_to_target (range: +180 to –180)
This is the smallest angle your robot will need to turn to be facing directly at your target. Negative angles mean that the target is to the right of the robot, positive angles are to the left.
Example:
// turn the robot left (counter clockwise) if target is to the left
if(angle_to_target > 5) // target to left
{
// turn left
force_right = 100;
force_left = -5;
}
damage_taken
The amount of damage taken during the last turn. This can come in handy if you want your robot to know when they are being shot.
Example:
if(damage_taken > 8)
{
// run from target
// …
}
distance_to_target
This is the distance (in quants) in a straight line to the target.
Example:
// fire at target when close
if(distance_to_target < 2000)
{
gun1_fire = 1; // fire primary
gun2_fire = 1; // fire secondary
}
gun1_ammo
gun2_ammo
Number of rounds left in the primary (gun1_ammo) or secondary (gun2_ammo) weapon. If the value is 999 the weapon has unlimited ammo (i.e. laser).
Example:
// run away from the enemy if we are out of ammo
if((gun1_ammo == 0) && (gun1_ammo == 0))
{
// run away
}
gun1_status
gun2_status
Current state of the primary (gun1_status) or secondary (gun2_status) weapon. Can have the following values: 0 if empty, 1 if ready to fire, -value if reloading (where value is the time in ticks before the weapon is reloaded).
Example:
// run away from the enemy if we need time to reload
if(gun1_status < -8)
{
// run away
}
los_to_target
This is a simple Boolean value. It equals 0 if your robot does not have "Line of Sight" to its target, 1 if it does. "Line of Sight" means that the robot can see the target if it was facing towards it (e.g. there are no walls between the robot and its target).
Example:
if(los_to_target == 1) // we have "line-of-sight"
{
// fire guns
}
my_health
This is the current health value of your robot. The value is the exact number of
points remaining before your robot is destroyed.
Example:
// run when low on health
if(my_health < 20)
{
// run away and hide
}
my_pos_vec
target_pos_vec
This is a vector (x,y,z) containing the current position of your robot (my_pos_vec) or the target robot (target_pos_vec) relative to the arena center point. Each value in the vector can be accessed individually using a .x, .y, or .z or be used as an argument in a vector command.
Example:
// make value1 = distance_to_target
value1 = vec_dist(target_pos_vec,my_pos_vec);
my_rot_vec
target_rot_vec
This is a rotational vector (pan, tilt, roll) containing the current orientation of your robot (my_rot_vec_ or the target robot (target_rot_vec) in degrees. The angle will always fall within the range –180 to +180. Each value can be accessed indivdually using a .pan, .tilt, or .roll or be used as an argument in a vector command.
Example:
// rotate to match target pan
if(my_rot_vec.pan > target _rot_vec.pan)
{
// turn right
force_right = -25;
force_left = 25;
}
else
{
// turn left
force_right = 25;
force_left = -25;
}
my_speed
This is the speed of the robot in quants per tick (qpt).
Example:
// speed up if under a certain speed
if(my_speed < 15)
{
// speed up
force_right = 100;
force_left = 100;
}
q_gun_shot
This value is set to 1 if the target just fired one of their weapons. Otherwise it is set to 0.
Example:
// try to dodge weapon
if(q_gun_shot == 1)
{
// dodge!
}
range_type
range_dist
range_angle
Each robot is equiped with a laser range finder pointing forward. This range finder senses obsticles in front of the robot up to 2000 quants away and returns the distance to that object in the value range_dist. The ‘type’ of object is also identified and stored in range_type (1 for a solid object like a wall, 2 if it is another robot, 0 if nothing is found).
The value set in range_angle depends on the object scanned. If the object is another robot, range_angle is set to that robot’s current heading. If the object is a wall, range_angle is set to the angle your robot would have to face to be heading directly away from the wall.
Example:
// avoid walls
if((range_type == 1) && (range_dist < 750))
{
value1 = range_angle; // value1 is the angle to turn to
}
target_est_health
This is the estimated health of your opponent. The value stored in
target_est_health represents the following: 4-opponent has full (or nearly full)
health, 3- target has taken light damage, 2- target has taken moderate damage,
1- target is heavily damaged, 0- target is dead.
Example:
// press the attack when target is weak
if(target_est_health <= 2)
{
// attack!
}
time_remaining
This is the time (in ticks) left in this match.
Example:
// don’t fire the primary weapon until halfway through the match
if(time_remaining > 60*16) // 60 seconds * 16 ticks/second
{
gun1_fire = 0; // don’t fire primary
}
time_delta
This is the number of ticks that has passed since the last turn.
Example:
// This fires the primary weapon every 5 seconds.
value5 += time_delta; // increament value5
if(value5 > 80) { gun1_fire = 1; value5 = 0; } // note: 80 = 5(seconds)*16(ticks/second)
hit_target
This is a flag (ON/OFF value only) which will be set to 'ON' if your opponent has taken damage in the last turn, otherwise it will be 'OFF'.
Example:
// call function three if we hit the target.
if(hit_target == ON)
{
FUNC_THREE();
}
qZone_own[3]
zone_dist[3]
zone_angle[3]
A collection of three element arrays containing information about each of the three zones. The center zone is contained in the zero offset (i.e. zone_dist[0] is the distance to the center zone). Offset 1 and 2 are the zones that start under robot #1 and robot #2.
qZone_own[n] contains ownership information for a zone. If you own this zone, the value will be 1. If your opponent owns this zone, the value will be -1. If nobody owns the zone, the value is 0.
zone_dist[n] and zone_angle[n] give the distance (in quants) and the angle (in degrees) of the corresponding zone from the robot.
Example:
// if we don't own the center zone...
if(qZone_own[0] <= 0)
{
// move to the center zone
value7 = ang(zone_angle[0] - my_rot_vec.pan);
FUNC_ONE(); // function to move in the direction given by value7
}
Constant Values
Constant values are values that can not be changed as they represent fixed values in the world (i.e. weapon range, reload times, etc). You can use these values in your scripts as needed as long as you treat them as fixed numbers. For example, it would make no sense to assign the value '5' a different value (5 = 2 + 7) so you shouldn't assign a different value to a constant (kReloadLaserTime = 2). Doing so will cause an error.
kRangeFinderDist
This is the maximum distance your robot's range-finder will detect something.
Example:
// Is the enemy in range of the range-finder?
if(distance_to_target < kRangeFinderDist) { /* do something */ }
kRangeLaser
kRangeMG
These are the ranges (in Quants) of the Laser and Machine Gun.
Example:
// save ammo/reload only fire when in range
if(distance_to_target < kRangeMG)
{
gun2_fire = 1; // fire secondary (MG)
}
kSpeedCannon
kSpeedRLauncher
These are the speeds (in Quants per Tick) of the Cannon and Rocket Launcher.
Example:
// calculate "time to target"
value1 = distance_to_target/kSpeedCannon;
kReloadLaserTime
kReloadMGTime
kReloadCannonTime
kReloadRLauncherTime
These are the reload times (in Ticks) of the Laser, Machine Gun, Cannon, and Rocket Launcher.
Example:
// attack as long as the 'counter' is less than laser reload time
value1 += time_delta; // inc counter
if(value1 < kReloadLaserTime)
{
FUNC_THREE(); // attack function
}
kDamageLaser
kDamageMG
These are the damage values done by the Laser and Machine Gun.
Example: <none>
kDirectDamageCannon
kDirectDamageRocket
These are the direct damage values done by the Cannon and Rocket Launcher. This damage is done only to the target hit and is in addition to the blast damage taken by the target.
Example: <none>
kBlastDamageCannon
kBlastDamageRocket
These are the blast damage values done by the Cannon and Rocket Launcher. This damage is done to all objects in the blast radius and is in addition to the direct damage taken by the target.
Example: <none>
kCannonBlastRange
kRocketBlastRange
These are the blast radii for the Cannon and Rocket Launcher. Any object this distance or closer to the hit point of the weapon will take blast damage.
Example:
// fire rocket only if the target is outside the blast radius
if(distance_to_target > kRocketBlastRange)
{
gun1_fire = 1; // fire rocket
}
Appendix B: Robot Chassis
There are four different robot chassis types to choose from. Each robot chassis has its own strengths and weaknesses. As the robot’s programmer, it is up to you to use those strengths and overcome the weaknesses to become the ultimate victor.
Chassis #1

|
Name:
|
Tank
|
|
Model Number:
|
3x0A45C973
|
|
Armor:
|
Heavy
|
|
Speed:
|
Slow
|
|
Weapon #1:
|
Cannon
|
|
Weapon #2:
|
Machine Gun
|
|
Desc:
|
This is the heaviest robot allowed to compete. Its cannon has long range striking power but it is difficult to hit fast moving targets with. The robot moves very slow, but has more armor than any other robot.
|
|
Hints:
|
Once you learn how to lead your target (or wait until your target has hit something), the cannon of this robot can make short work of them.
|
Chassis #2

|
Name:
|
Launcher
|
|
Model Number:
|
3x0A455432
|
|
Armor:
|
Medium
|
|
Speed:
|
Medium/Slow
|
|
Weapon #1:
|
Rocket Launcher
|
|
Weapon #2:
|
Machine Gun
|
|
Desc:
|
The homing rocket makes aiming less of an issue with this robot, but fast robots can still avoid being hit if they are given enough time to move.
|
|
Hints:
|
The rocket is really good at medium ranges. Too far and the target can dodge, too close and you will take damage from the blast.
|
Chassis #3

|
Name:
|
Fast Attack
|
|
Model Number:
|
3x0A458E27
|
|
Armor:
|
Light
|
|
Speed:
|
Very Fast
|
|
Weapon #1:
|
Machine Gun
|
|
Weapon #2:
|
Machine Gun
|
|
Desc:
|
"Speed Saves!". This robot has the lightest weapons and armor but its high speed makes it a crowd favorite. This may be the most difficult robot to program since the machine guns require that it hit its target multiple times (while avoid being hit itself).
|
|
Hints:
|
Full speed and avoid hitting walls and other robots. If you "lock-up" with another robot you will soon be finished.
|
Chassis #4

|
Name:
|
Hover
|
|
Model Number:
|
3x0A4512EA
|
|
Armor:
|
Medium
|
|
Speed:
|
Fast
|
|
Weapon #1:
|
Laser
|
|
Weapon #2:
|
Laser
|
|
Desc:
|
The dual lasers make this robot fearsome, but the long reload times are a real weakness.
|
|
Hints:
|
Make your shots count and then try to avoid being hit while you recharge.
|
Appendix C: Weapon Systems
Rocket Launcher
Rockets are slow but they can home in on their targets.
When using this weapon make sure that you are far enough away from your target so your robot doesn’t take damage in the blast as well.
Laser
The laser is a great weapon because of its range and unlimited ammo supply. Since the beam moves at the speed of light you don’t have to lead your target at all. The downside is that after every shot the laser capacitor has to rebuild a charge, this mean that the laser can only be fired once every couple of seconds.
Machine Gun
The machine gun shoots several small high-velocity bullets per second. The damage per shot is minimal but adds up quickly.
Cannon
Cannon rounds do a great deal of damage but are the most difficult weapon to hit with. Cannon are slower than machine gun rounds and do not home in on their target like rockets do but they do less "blast damage" so they can be used at closer ranges.
Appendix D: Robot Physics
Even though the robots are very different in their size, weight, and drive methods, they follow the same basic rules for maneuvering. Each robot has two independently controlled ‘wheels’ (treads, hover-pod, etc) one located on either side of the robot. By applying forces to the wheels (using force_right and force_left) you can make the robot move forward, backwards, rotate in place, or any combination of the above (i.e. move forward while rotating clockwise).
Moving forward and backwards is trivial, simply apply equal force to both wheels:
// move forward at half speed
force_left = 50;
force_right = 50;
To turn in place apply opposite forces to each wheel:
// rotate in place clockwise
force_left = 25;
force_right = -25;
If there is a difference in the amount of force to either wheel then the robot will rotate towards the wheel with the lower force:
// go forward and to the right
force_left = 75;
force_right = 50;
Remember, each robot behaves differently due to their mass, drive power, and size. While the lightweight wheeled robots can maneuver quickly the heavier treaded robots move much slower. Robots with treads take longer to "get up to speed" while wheeled robots move so fast that it’s hard to keep them from running into walls.